A precise guide on why and how to unblock Apple TV in restricted areas with VPN for unlimited streaming.
It is therefore clear that VPNs are not limited to IT staff or someone in a repressive regime. People use it for many things, including unblocking geo-blocked streaming content, securing themselves on public Wi-Fi, torrenting and so on.
Why use a VPN for Apple TV?
As an Apple TV user, you might have noticed that it’s not just about Apple TV+. You can enjoy loads content, including Netflix, Disney+, Prime Video, etc., and do much more than just stream movies.
So, a VPN allows you to enjoy worldwide regional content that is otherwise restricted. Plus, it will add a powerful layer of security if you double up your Apple TV as a smart home hub.
So, how you can integrate a VPN into your Apple TV?
How to setup a VPN for Apple TV?
There are three main methods to install a VPN for apple TV.
Method 1. Installing a VPN on your router
This may sound like something like for IT professionals, but it’s not. You will need a VPN username and password and a VPN configuration file.
But before that, you need to check that your Wi-Fi router is VPN-compatible. Because most often routers provided by your ISP will not support VPN integration.
However, if you are sure about your router, the next thing to check is the router’s dashboard.
First try 192.168.1.1 in your browser. It may display a dangerous warning, which you can safely avoid (only in this case).
If this doesn’t open the router’s console, try finding the default gateway URL on the command line using the ipconfig/all command.

This will open the router’s login page asking for a username and password that is different from the VPN account credentials.
Now look for the VPN tab in the left side panel. Although this may also be hiding in the advanced settings or anything else based on the router interface.
Once you have found the VPN option, the next steps include logging into the VPN service’s web interface, finding the configuration files, uploading them to the router and entering the VPN credentials.
As this mainly depends on the router and VPN provider, unfortunately there is no common method to illustrate this.
Method 2. VPN-powered mobile hotspot
This is easier than the previous method. To do this, you need a VPN client installed on your laptop and an active mobile hotspot to extend VPN security to the Apple TV.
- Step 1. Activate the mobile hotspot
To start, the mobile hotspot will help your laptop act as a (virtual) router to share its Wi-Fi or Ethernet connectivity with other devices.

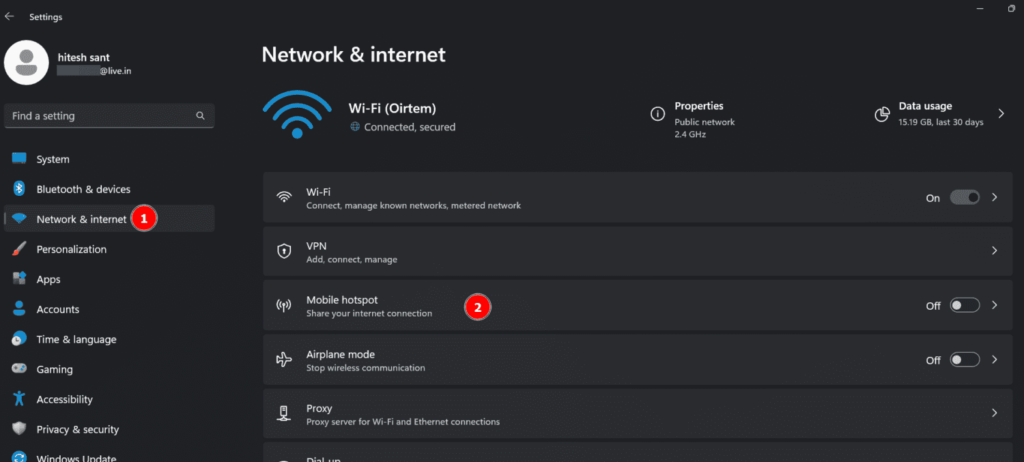
These settings can be found in Settings> Network and internet> Mobile hotspot.

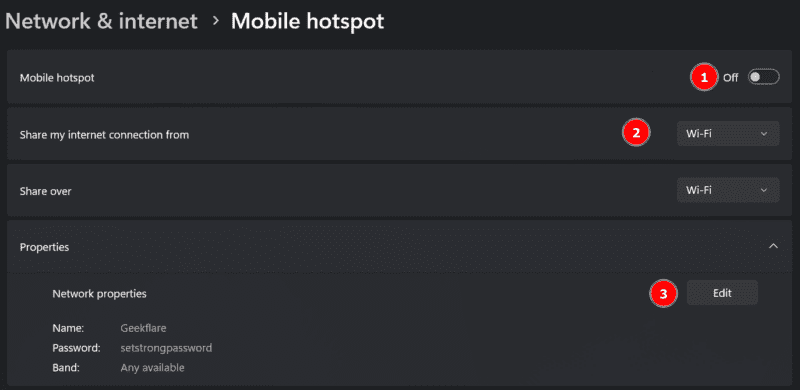
Next, we need to configure the hotspot network (marked 3), including its name and a suitably strong password. Finally, turn on the switch (labelled 1) and make sure it provides Wi-Fi connectivity (labelled 2).
- Step 2. Enable VPN sharing
This step includes some tweaks to enable VPN tunneling over the mobile hotspot we just activated in the previous step.

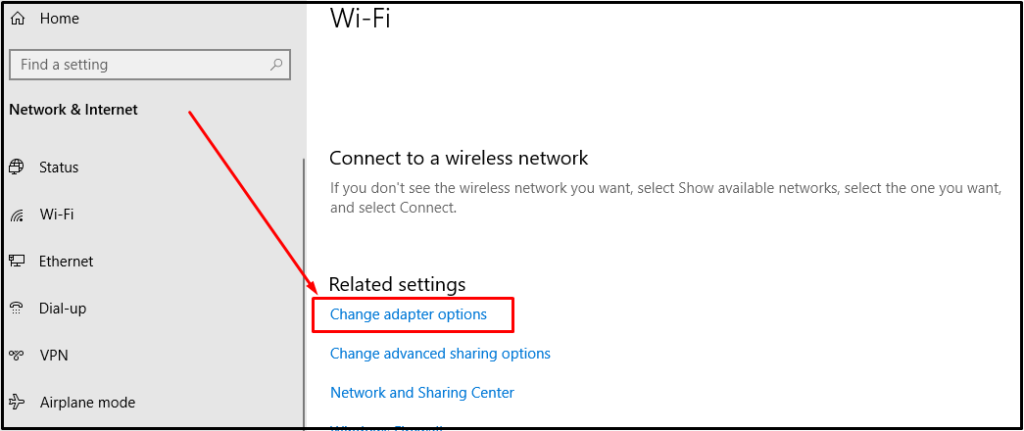
Go to Control Panel > All Control Panel items > Network and Sharing Centre.
Now click Change adapter settings in the side panel.
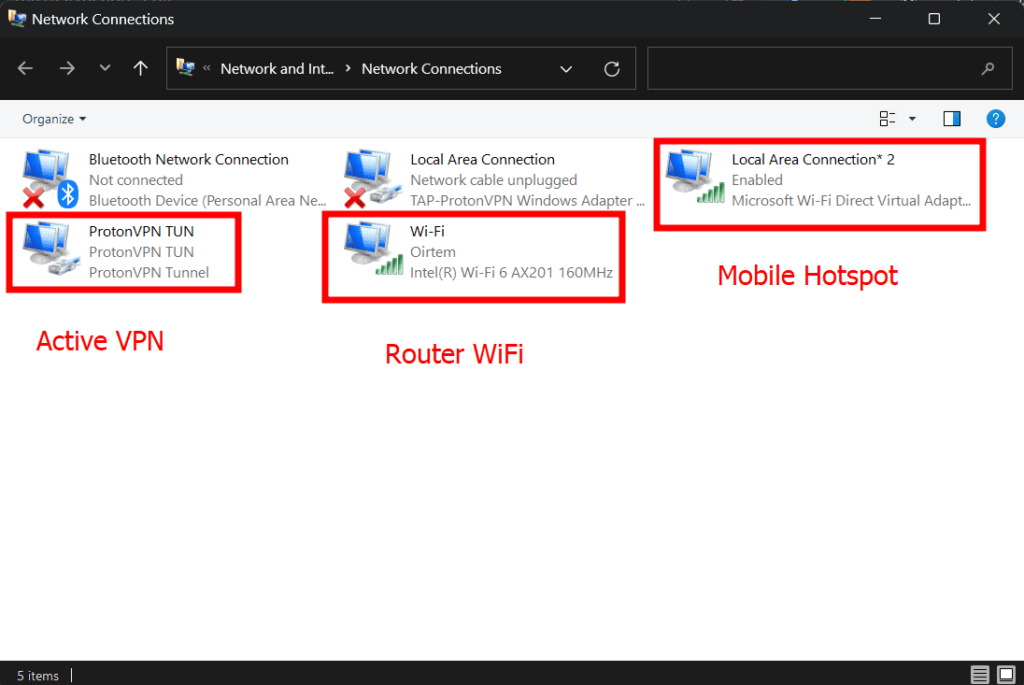
This will have three active configurations: VPN connection, mobile hotspot and WiFi (or Ethernet) router.

The option to allow VPN encryption over the hotspot must be configured in the VPN. Right-click the VPN connection and click Properties.
Select “Sharing” (as 1), allow internet sharing (as 2) and select the network (as 3).


Here, the network will be the one that refers to the hotspot. Finally, click OK.
Now you can connect your Apple TV to your computer to use location falsification via VPN.
Method 3. Apple TV DNS settings
This involves using smart DNS, which tricks streaming platforms into believing that you are connecting from an ‘allowed’ location.
This is very much like using a VPN without encryption. This means no ‘extra’ security to slow down your network speed.
Put simply; you use a different DNS server to your ISP. And while Apple TV does not yet have native VPN support, it is compatible with a custom DNS server.


Importantly, you should use your VPN provider’s smart DNS server or a service such as SmartDNSProxy. (The process varies depending on the service)
So follow the steps below once you have a DNS server address.
Open your Apple TV settings and go to network. Here tap on connection, Ethernet or Wi-Fi, depending on which you are using.
Then go into Configure DNS and switch to Manual.
Finally, enter your SmartDNS address, click Done and restart.

